Map a Docker volume to a Windows network path

June 24, 2021

If you have an API that makes use of Windows file system and is running inside a Linux container then you need to find a way to access the Windows file system.

The solution for this problem was to create a volume that was attached to the service. This volume was pointing to the shared network path (like in the picture below):

Other options are:

  • Bind mounts (dependent on the folder structure and OS of the host machine)
  • tmpfs mounts (in memory)

Volumes are usually the preferred way to persist data that is generated by and used by Docker containers.

Other advantages of using volumes:

  • can be migrated and backed-up very easily
  • can be managed using CLI commands or the Docker API
  • can work on both Linux and Windows containers

Steps to do that:

  1. Update the docker-compose.yml file to declare a volume:

The volume is using CIFS (Common Internet File System) which is a filesystem protocol used for shared access to files and printers between machines on the network.

2. Attach the volume to the API:

2. Update the .env file with the needed variables.

STORAGE_DISK_PATH=//hostname/Labels

STORAGE_USERNAME=your_username

STORAGE_PASSWORD=your_password

STORAGE_FILE_MODE=0777

STORAGE_DIR_MODE=0777

When you run the API you should see the /data folder being mapped to the Windows network path.

Google Assistant – How to create a chatbot

December 6, 2018

Hi,

I have played with Google Assistant this year and built a chatbot that lets the users to manage team building locations (venues). A venue consists of these properties: number of rooms, number of guests, location and a short description.

The tools and technologies I’ve used are:

  1. Node.js
  2. DialogFlow – Platform used for building bots (owned by Google)
  3. Firebase – Development platform used to build, monitor and host projects (owned by Google)
  4. Cloud DataStore – NoSql database service (owned by Google)

If you want to create, test and deploy a chatbot you need to perform the steps below:

  1. Install Node.js.
  2. Install Firebase CLI – Firebase will be used to create the deploy Google cloud functions. The commands are listed below:
  • npm install firebase-functions@latest firebase-admin@latest –save
  • npm install -g firebase-tools
  • firebase login
  • firebase init – this command installs dependencies with npm. After that we can start writing our cloud functions. The code can be found here.
  • firebase deploy – deploy the cloud functions as fulfillment to google cloud. You will see a functions url available:

       3. Create the intents using DialogFlow console – the intents can be found here.

The source code can be found at this github repo.

SVN2GIT – An easy guide of migration

September 30, 2016

migration_steps


Hi,

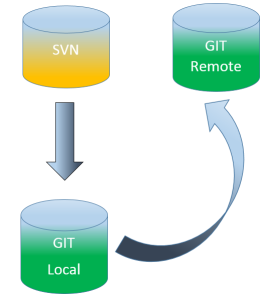
I have recently spent some time trying to migrate several SVN repositories to GIT. The tool that I used was called SVN2GIT and the detailed steps can be found below:

  1. Generate the authors.txt file.
  2. Copy the authors.txt file to your local .git folder.
  3. Open Command Prompt, navigate to your .git folder and run this command if your repo doesn’t follow the classic structure (/tags, /branches, /trunk):

 svn2git <svn_repo_url> –rootistrunk –authors authors.txt

repo_no_branches

      4. If your repo does follow the classic structure then you can choose to exclude the tags and branches folders to save time and disk space:

svn2git <svn_repo_url> –notags –nobranches   –authors authors.txt

repo_with_all_branches

      5. Go to the remote GIT server and create a new remote repository.

      6. Then you need to configure GIT for the first time:

git config –global user.name “your name”

git config –global user.email “your email”

stash

N.B.: The GIT repository should remain as read-only until the whole team switches to GIT for all the projects.

If multiple SVN commits are performed after the migration please follow these steps to easily synchronize both repos:

  1. Open Command Prompt
  2. Go to your local GIT repository.
  3. Run this command to import all the recent SVN commits into the local GIT repository:

svn2git –rebase

  1. Run this command to push all the changes to the remote repository:

git push origin master


Atlassian has its own tool of migration but it needs more steps than SVN2GIT to migrate a repo.


In the next part I will present several issues that were found during migration:

Issue 1: The XML Response contains invalid XML: malformed XML: no element found at /mingsv64/share/perl5/site_perl/git/ra.mp line 312.

Explanation: This issue usually occurs when dealing with very large repositories (like mine) and when this command is applied on the root directory:

               svn2git <svn_repo_url> –notags –nobranches   –authors authors.txt

After tens of thousands of revisions being migrated this process stops due to unknown issues.

Solution: Instead of going on the root directory and exclude the /branches and /tags folders we went straight to the /trunk folder and ran this command:

svn2git <svn_repo_url/trunk> –rootistrunk –authors authors.txt

Issue 2: Global .GITCONFIG file may be located on a shared network drive (H :\).

Explanation: If you’re using a client computer that runs inside their corporate network then this situation is very likely to occur.

Solution: Move the .GITCONFIG file from the network drive to your local drive and add this environment variable GIT_CONFIG that points                 to your local folder.  If GIT_CONFIG is not working add the HOME environment variable instead.

  • Moving the .GITCONFIG file to the C drive might cause permission restrictions. In this case move the config file to this location: C:\ProgramData\
  • The local folder can be any folder of your choice. If there is only C: drive on the disk try and place it in here: C:\Program Files\Git\etc
  • Check where .gitConfig file is located: git config –list –show-origin

How to automatically install an .exe into a remote AWS EC2 instance (part 2)

August 30, 2016

Hi,

In this post I will show you how to run the PowerShell command from part 1 on all EC2 instances.

  1. Connect to AWS Console using your own credentials.
  2. Go to Compute -> EC2 and select Command History

ec2_console

  1. Select Run a command.
  2. Choose AWS-RunPowerShellScript.

send_command_window

       5. Select an instance from the instance list. If the desired instance is not in the list then jump down to SSM Run Command Prerequisites section for more pieces of information.

choose_instance

6. Copy paste the PowerShell script in the Commands field (you can take the script from part 1 of this article which can be found here)

  7. Run the Command.


SSM Run Command Prerequisites:

Make sure the following steps are verified such that an EC2 is ready for SSM:

  1. Check that the EC2 instance has an IAM role associated to it.
  2. If it doesn’t then this means that the SSM Service can’t be used on that instance because it requires a role and you can’t add a role to an already launched instance. In this case you need to create an AMI from the existing EC2 instance and then launch a new instance from that AMI. During the launch process you will be able to attach a role to the new instance.
  3. If the EC2 instance has a role then you need to make sure the SSM Policy is attached to that role (Roles -> Policies -> Attach Policy -> AmazonEC2RoleForSSM).
  4. Install the latest version of EC2 Service on the EC2 instance:(http://aws.amazon.com/developertools/5562082477397515)

Useful links:

  1. http://docs.aws.amazon.com/ssm/latest/APIReference/Welcome.html
  2. http://docs.aws.amazon.com/AWSEC2/latest/WindowsGuide/walkthrough-ui.html
  3. http://docs.aws.amazon.com/AWSEC2/latest/WindowsGuide/remote-commands-prereq.html


How to automatically install an .exe into a remote AWS EC2 instance (part 1)

July 4, 2016

Hi,

If one needs to have an .exe installed on a EC2 instance in AWS, there are a few ways to do that:

  1. Manually connect to each remote machine and install that .exe – easy but time consuming if there are 10 instances behind a load balancer
  2. Create a PowerShell script that can be run on all EC2 instances in the AWS Cloud – more trickier to implement in the first place but really helpful afterwards

I would go for option 2 because the benefits are substantial: centralized repository for the kits, copying/installing a kit on as many instances as you want with a touch of a button.

The architecture for the second scenario is described below:


latest_image

  1. Upload the .exe into the S3 bucket.
  2. Write a PowerShell script that downloads the .exe from the bucket into each of the EC2 instance if it has not been downloaded yet.
  3. Install the .exe on each instance if it hasn’t been installed yet.

The code for the PowerShell script is listed below:

# copy the .exe from the S3 bucket to the EC2 instance
$isEXEKitOnEC2Instance = Test-Path “C:\kits\yourApp.exe”
if ($isEXEKitOnEC2Instance -eq $false)
{
echo “Copying the kit from the S3 bucket to the EC2 instance.”
Copy-S3Object -BucketName aws-exe-bucket -Key yourApp.exe -LocalFile c:\kits\yourApp.exe
# delay the next command with 10 seconds (this will give time for the .exe to be copied)
Start-Sleep -s 10
echo “The ,exe has been copied to the EC2 instance.”
}
else
{
echo “The kit is already on the EC2 instance and will not be copied anymore.”
}

# check if the .exe is already installed on the machine
$isExeInstalled = Test-Path “C:\installation_path\yourApp.exe”
if ($isExeInstalled -eq $false)
{
echo “The .exe is not installed. Install is in progress…”
# run the .exe on the remote machine in silent mode
Invoke-Expression “c:\kits\yourApp.exe /S”
}
else
{
echo “The .exe is already installed.”
}

In part 2 I will show you how this script will run on all selected AWS instances.

AWS and Security Groups

April 4, 2016

I was asked to allow different IP addresses to gain access to a specific machine from AWS. Initially I thought: oh well, this is quite easy to do from AWS Console -> Security Groups -> Inbound -> Edit -> Type the new IP address and hit OK.

add_rule

After taking a closer look I realized that this Security Group was shared by other AWS instances and this new rule would have been used by all the shared instances which was not desirable.

OK, in this case I had to take a different approach: changing the Security Group for that machine. I went to the menu associated to that instance and changing the Security Group option was disabled.

change_security_group_disabled

The reason was that I was using an AWS Classic Instance which does not allow a security group to be changed after its launched. Using a VPC one can re-assign the security group once it’s being launched and one will have more flexibility for modifying security groups settings in general.

The best solution in this case was to create a new instance and assign a new Security Group to it.

The steps I had to take are described below:

– Create an AMI of the existing instance to preserve the data on it

– Setup all the settings for this new AMI

– Create a new instance using that AMI

– Terminate the old instance

–  Associated the Elastic IP of the old instance to the new instance

This is a small drawback that AWS has when it comes to AWS Classic instances. Hopefully in the future one will simply change the Security Group without going through the whole hassle of creating new instances and dropping others.

AWS: Pre-warming the Load Balancer

March 18, 2016

Do you expect a spike in traffic? Let’s say your stakeholders expect a ramp of 20.000 users in the first minutes of your website. How do you handle a scenario where you expect tens of thousands of users in the first minutes since the launch of your website? This is a great example of handling fault tolerance in AWS.

If one wants to achieve fault tolerance in AWS, there a few options to do that:

  1. Use a Load Balancer – no matter how much the traffic increases, if you place your instances behind a Load Balancer it is always a great idea because the traffic is balanced across all the healthy instances.
  2. Use an Auto Scaling Group – this that can scale up/down with as many instances as you want, this is a really powerfull feature of AWS that one can use.

The ELB is designed to handle large loads of traffic (20kb/sec) without a problem when this traffic increases gradually over a long period of time (several hours). However, when you expect high increase in traffic over a short period of time, then you face a problem.

AWS considers that if the traffic increases more than 50% in less than 5 minutes then it means that the traffic is sent to the load balancer at a rate that increases faster than the ELB can scale up to meet it. What can you do in such cases?

Well, one needs to contact AWS to do an operation called “pre-warming”. What does that mean? This means that the AWS tech guys will configure the Load Balancer to have an appropriate level of capacity based on the expected traffic. There is a full list of answers that the AWS guys need in order to do that and I share that list below with some of the values we used already for this operation:

1. Traffic delta or request rate expected at surge(in Requests Per Second)

2. Average amount of data passing through the ELB per request/response pair (In Bytes)

3. Rate of traffic increase i.e. % increase over a time period

4. Are keep-alives used on the back-end?

5. Percent of traffic using SSL termination on the ELB

6. Number of Availability Zones that will be used for this event/load balancer

7. Is the back-end scaled to event/spike levels? [Y/N] [If N, when will you scale the back-end? and how many and what type of back-end instances

8. Start date/time and timezone for elevated traffic patterns

9. End date/time and timezone for elevated traffic patterns

10. A brief description of your use case. What is driving this traffic? (e.g. application launch, event driven like marketing/product launch/sale, etc)

One important thing: you need to send this list 36 hours in advance so that AWS has enough time to process your request.


AWS: Timeout issues

March 9, 2016

Hi,

In this post I will talk about the code updates triggered from Team City that were failing in AWS. This caused the updates in AWS to be rolled back.

The errors I got were:

Updating Auto Scaling group named: MyScalingGroup failed. Reason: Failed to receive 1 resource signal(s) within the specified duration

and

Instance id(s) ‘my-instance-id’ did not pass health check after command execution. Aborting the operation.

Initially I believed that these have happened because the instances failed to finish their health checks. I tried a few things to solve this issue:

1) Made a Service Role for the environment.

2) Set the Health Target to TCP:80.

3) Increased the timeout value for health-checks.

Unfortunately none of these seemed to work.

After many hours spent on investigating this issue I decided to also look in the Load Balancer settings and in the Auto Scaling Group settings and I noticed a very interesting behavior.

The Load Balancer was using 2 Availability Zones (1b and 1c) while the Auto Scaling Group was using 3 Availability Zones (1a, 1b,1c). That meant that every new instance that was spun off by the Auto Scaling Group was in the AZ that was not associated to the Load Balancer (1a). This has led to the issue that AWS could not perform the heath checks because it couldn’t reach that instance at all.


HangFire and ASP.NET MVC

February 2, 2016

Hello,

In this post I will talk about how I used HangFire in an ASP.NET MVC application.

First of all, what is HangFire? HangFire is a tool that is used to perform recurring tasks inside ASP.NET applications. It uses a persistant storage behind the scenes (i.e.: like SQL Server) that is used to store the jobs that can be later on retrieved and re-run in case some of them fails to run to completion.

The code below illustrates how I created a job that sends emails with CSV attachments every day at 8 AM.

hangfire_code_snippet

This tool also has a console that can be accessed locally only (for security purposes) and it looks like the image below:

hangfire

From the console one can see all the recurring jobs that are available and can trigger any of them at any time.

hangfire_recurring_jobs

More information can be found at this url:  About HangFire


Raven DB Exception

January 8, 2016

This post is about an exception that was logged in Elmah in one of the web projects I’ve worked on:

Could not open database named: X
System.TimeoutException: The database X is currently being loaded, but after 5 seconds, this request has been aborted. Please try again later, database loading continues.

This happens when the below code is executed on a database of 65.000 documents:

var documentStore = new DocumentStore

{

ConnectionStringName = RavenDbInstance
};
documentStore.Initialize();
using (var session = documentStore.OpenSession())
{
registered = session.Query<MyModel>().FirstOrDefault(x => x.Name == name);
}

The reason why this happens is that if the database is loaded for the first time in memory, the task that loads it will wait for 5 seconds before throwing an exception. There is a configuration setting called Raven/MaxSecondsForTaskToWaitForDatabaseToLoad which can be increased to avoid such scenarios if the database is getting larger and larger.


One other thing to consider is increasing the time allowed for a database to be idle.

If the database is idle for long periods of time it will get evicted from the memory which causes the web server to load the DB from disk which will get us to the first scenario.

The default value for this configuration setting is 900 seconds:

Raven/Tenants/MaxIdleTimeForTenantDatabase